Feeds:
Posts
Comments

Posts Tagged ‘pattern’

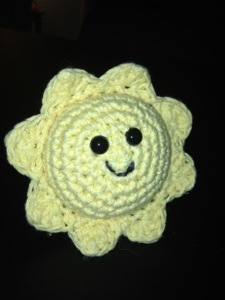
20130125-174441.jpg

Here Comes the Sun Amigurumi

Tools:
E (3.5mm) crochet hook, or desired hook size
Yarn needle

Materials:
Small amount Worsted weight cotton yarn
Small amount embroidery thread
Set of safety eyes
Polyester fiberfill

Special instructions:

How to start with a magic ring

Sun is worked in two parts with spiral rounds (unjoined rounds). The border around the sun joins the two halves.
Sc = single crochet
St = stitch
Sc inc = 2 single crochet in same stitch
Sl st = slip stitch
Dc= double crochet
Tr = treble crochet

Pattern:

Body
MAKE 2
Begin with magic ring
Round 1: 6sc in ring, do not join, do not turn, place marker and move up at the end of each round (6sc)
Round 2: sc inc around (12sc)
Round 3: (sc, sc inc) around (18sc)
Round 4: (sc in next 2 st, sc inc) around (24sc)
Round 5: (sc in next 3 st, sc inc) around (30sc)
Round 6: sc in each st around (30sc)
Fasten off, weave in ends.
Affix safety eyes and embroider mouth to the right side of one body piece.

Edging
Round 1: With wrong sides of body held together and face facing you, join yarn with sc through both loops of both pieces. Continue sc all the way around being careful to go through both thicknesses. Stuff piece when you have 5 or 6 stitches left. Join with sl st to first sc. (30sc)
Round 2: *sk 1 st, (2 dc, tr, 2 sc) all in next st, sk 1 st, sl st in next st two rows below* repeat from * to * 6 more times, sk 1 st, (2 dc, tr, 2 dc) all in next st, sl st in st two rows below join for this round, join with sl st to first dc. (8 points)
Fasten off and weave in ends.

I have not tested this pattern so please let me know if you have trouble or find errors! Thanks.
This pattern was influenced by Amigurumi Sun by Imaginary Wardrobe ; however, the construction of each pattern and the borders are different.
Read Full Post »

Day 27: Create something using a jumbo hook


That’s my jumbo hook, which you may have seen in the posts about broomstick lace and i-cord, shown next to an F-hook for comparison. I have no idea what size my jumbo hook is and it doesn’t really matter all that much because jumbo hook patterns usually are not gauge-critical.

Jumbo Hook Hat

Materials: Jumbo hook
ww yarn in two colors (mine is acrylic)

Hold two strands together and work as one
Start with a magic ring
Rd 1: ch 1, 6 sc into ring, join (6 sc)
Rd2: ch 1, 2 sc into each st, join (12 sc)
Rd3: ch 1, *(2 sc in next st, 1 sc in next st)* around, join (18sc)
Rd4: ch 1, *(2 sc in next st, sc in next 2 st)* around, join (24 sc)
Rd5+: Do not join, but work in a spiral, sc in each st until desired hat height. (Mine looks to be about 7 rounds of this, so 11 rounds total before the last round)
Last Rd: Sl st in each st and join

This is pretty much your basic sc hat pattern. The amount of rounds you need to increase (rounds 1 through 4) will depend on your hook size, yarn weight, and the circumference of the head for the hat.

And now, some ridiculous self-portraits of me. I’ve decided the hat can be worn two ways.

The first way is like a skull cap. Or in my case, a retro swimming cap look.

And the way I will likely wear it – pulled back on my head so that it looks like a bonnet-type thing or Amish head covering. Good way to hide a bad hair day…or maybe it makes it worse. You decide.

PS It’s my birthday! When I was growing up, on my birthday my mom and dad would blast Birthday by the Beatles on the stereo first thing in the morning.

Read Full Post »

Day 10: Create a hotpad or other kitchen item

Back on track. Up in the left corner you can see I finished my apple coasters! In the right corner is a Spiral Apple Tawashi Scrubber, super fun to make! Finally, a dishcloth using the red and green Drops Ice cotton blend.

Dishcloth

Materials:
ww cotton yarn in two colors (A main, B contrast)
H-hook
Notes: Do not fasten off colors, carry unused color up the side

R1: With A, begin with a chainless row of 23 dc (YouTube: how to do a chainless dc row)
R2: ch 1, turn, sc in first st, (ch 1, sk next st, sc in next st) to end switching to B in last st
R3: ch 1, turn, sc in first st, (dc in skipped st from previous row, sc in next st) to end
R4: ch 1, turn, sc in first st, (ch 1, sk next st, sc in next st) to end switching to A in last st
Continue with this pattern repeating R3 and R4 (alternating colors every two rows) until your piece is almost square. End with R3 in color A.
Last Row: turn, Ch 2 (counts as st), dc in each st across, end off.
(My dishcloth is 22 rows and slightly taller than square)

The result is a reversible spike-stitch design. Make it a hotpad by crocheting two pieces and joining them with an edging. Since my yarn is rather thick, I think I can use mine as a hot pad anyway!

Read Full Post »

Day 5: Dishcloth Design – Lace

Will update with the pattern for this later!

Read Full Post »

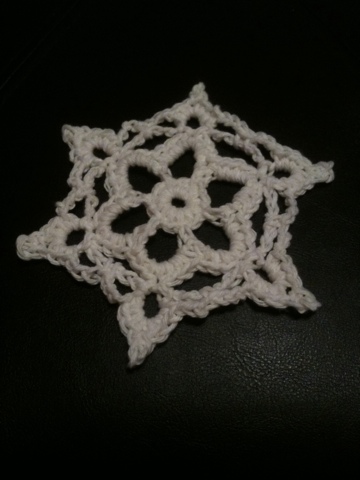
Day 3: Design a snowflake

20111003-061925.jpg

Snowflake Pattern
*This pattern has not been tested and is a rough draft!*

Materials: ww white yarn, E or F hook (normally I would make this snowflake with size 10 cotton crochet thread and a steel hook, but I had some ww cotton on hand)

Ch 5, join to form ring
Rd 1:  Ch 1, 12 sc in ring, join to 1st sc
Rd 2: ch 1, sc in same st as join, (ch 6, sk next sc, sc in next sc) 5 times, ch 6, join to first sc
Rd 3: 7sc in each ch 6 loop, join to first sc
Rd 4: sl st to middle st of 7sc group, ch 5, (sl st in same st, ch 6, sl st in center sc of next 7sc group, ch 5) around, join to sl st in middle of first 7sc group
Rd 5: (3 sc in next ch5 loop, ch 3, sl st in 3rd ch from hook, 3 sc in same ch5 loop, ch 3, sc in next ch6 loop, ch 3) around, join to 1st sc

Read Full Post »

Day 1: Design a Flower

Star Flower Pattern:

*This pattern has not been tested and is in rough form!*

Materials:
2-ply sport weight cotton
E/4 3.5mm hook (I crochet loosely, so you may want a bigger hook)

Start with a magic ring
Rd 1: Ch 1, 12 sc in ring, join
Rd 2: (ch 3, sk next sc, sl st in next sc) 5 times
Rd 3: [(sc, hdc, 3 dc, hdc, sc) in next ch 3 space, sl st in same space as sl st on Rd 2] around
Rd 4: Working behind petals just made, (ch 5, sl st in next sl st) around
Rd 5: [(sc, hdc, 5 dc, hdc, sc) in next ch 5 space]  around, join to first sc
Rd 6: Working behind petals just made, (ch 7, sl st in space between next 2 sc) around
Rd 7: [(sc, hdc, dc, 3 tr, dc, hdc, sc) in next ch 7 space, sl st in space between next 2 sc on Rd 5] around
Fasten off & weave in ends.

That’s it! Hope you have fun with today’s challenge designing a flower  (or following a pattern for a flower!).

Read Full Post »